概要
記事の作成(または更新)時に、記事の情報から自動でOGP用の画像を生成します。
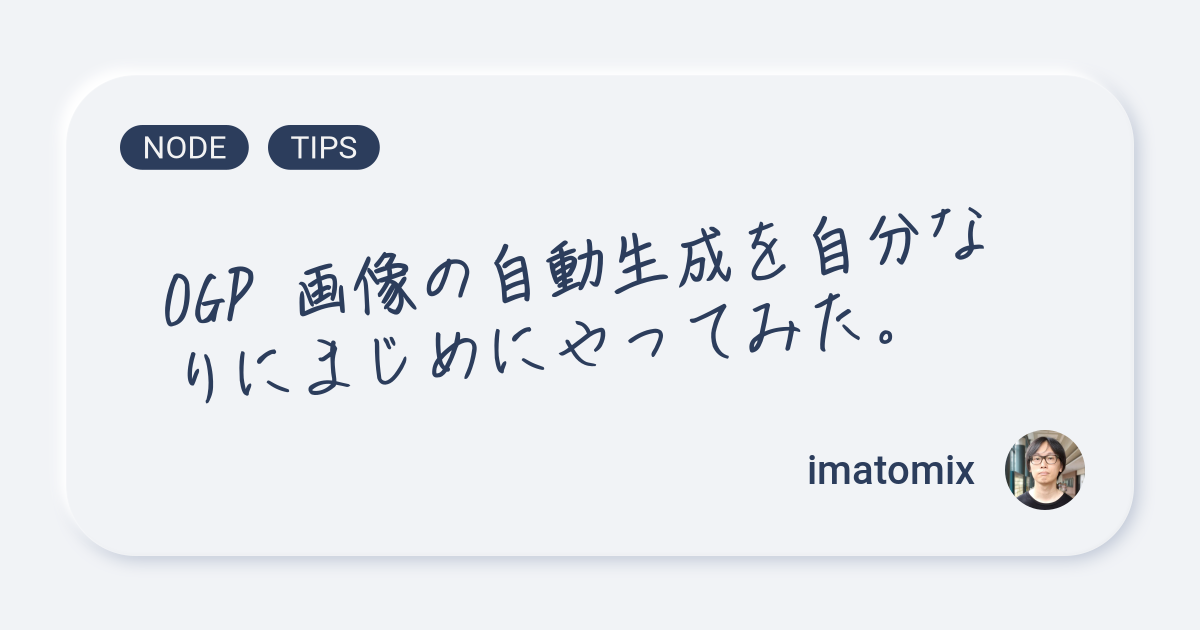
完成形
記事を投稿すると、記事情報を元に、以下のような画像を自動生成する。
仕様
ライブラリ
主にノート情報の描画
背景画像とcanvas画像の合成
ファイルとして保存
sharp 単体では文字を扱えない。
他の個所でsharp を使用しているためsharpを用いたが、node-canvasだけでもできそう。それかsharpがテキストに対応してくれればそれが一番いい。
本体
import fs from 'fs'
import sharp from 'sharp'
import {
createCanvas,
registerFont,
loadImage,
Canvas,
NodeCanvasRenderingContext2D,
} from 'canvas'
import { Note, User } from '@/interfaces'
export const generateOgpImage = async (note: Note) => {
const width = 1200
const height = 630
registerFont('path/to/fonts/TA_kobe_bold.ttf', { family: 'font' })
registerFont('path/to/fonts/Roboto-Regular.ttf', { family: 'roboto' })
registerFont('path/to/fonts/Roboto-Medium.ttf', {
family: 'roboto',
weight: 'bold',
})
const canvas = createCanvas(width, height)
const context = canvas.getContext('2d')
context.textBaseline = 'middle'
context.fillStyle = '#2c3d5c'
drawTagList(context, note.tags)
drawTitle(context, note.title)
await drawAuthor(context, note.user)
await saveOgpImage(canvas, note)
}
タグ情報
const drawTagList = (context: NodeCanvasRenderingContext2D, tags: string[]) => {
const fontSize = 32
const offset = { x: 120, y: 125 }
context.save()
context.font = `${fontSize}px roboto`
context.textAlign = 'left'
tags.map((tag, index) => {
const text = tag.toUpperCase()
const width = context.measureText(text).width
if (offset.x + width > 800) return
drawRoundRect(
context,
offset.x,
offset.y,
width + fontSize * 1.4,
fontSize * 1.4,
fontSize * 0.7
)
context.fillStyle = '#f3f3f3'
context.fillText(text, offset.x + fontSize * 0.7, offset.y + fontSize * 0.7)
context.fillStyle = '#2c3d5c'
offset.x = offset.x + width + fontSize * 2
})
context.restore()
}
角丸四角形の描画
const drawRoundRect = (
  context: NodeCanvasRenderingContext2D,
  x: number,
  y: number,
  w: number,
  h: number,
  r: number
) => {
  context.beginPath()
  context.moveTo(x + r, y)
  context.lineTo(x + w - r, y)
  context.arc(x + w - r, y + r, r, Math.PI * (3 / 2), 0, false)
  context.lineTo(x + w, y + h - r)
  context.arc(x + w - r, y + h - r, r, 0, Math.PI * (1 / 2), false)
  context.lineTo(x + r, y + h)
  context.arc(x + r, y + h - r, r, Math.PI * (1 / 2), Math.PI, false)
  context.lineTo(x, y + r)
  context.arc(x + r, y + r, r, Math.PI, Math.PI * (3 / 2), false)
  context.closePath()
  context.fill()
}
タイトル
context.measureText で文字列の長さを測り、折り返し位置を決める。
contaxt.canvasからcanvasのサイズがとれる。
context.save と context.restore で、コンテキストの編集の影響を外に出さない。
const drawTitle = (context: NodeCanvasRenderingContext2D, text: string) => {
const fontSize = 64
const title = text.length > 50 ? text.slice(0, 49) + '...' : text
const { width, height } = context.canvas
context.save()
context.font = `${fontSize}px font`
context.rotate((-5 * Math.PI) / 180)
context.translate(-50, 55)
let line = ''
const lines = []
for (let i = 0; i < title.length; i++) {
line += title[i]
const lineWidth = context.measureText(line).width
if (lineWidth > width - 400 || i == title.length - 1) {
lines.push({ text: line, width: lineWidth })
line = ''
}
}
const lineWidth = Math.max(...lines.map((line) => line.width))
const lineHeight = fontSize * 1.2
const x = lines.length > 1 ? (width - lineWidth) / 2 : width / 2
context.textAlign = lines.length > 1 ? 'left' : 'center'
lines.forEach((line, index) => {
const y =
index * lineHeight + height / 2.1 - (lineHeight / 2) * (lines.length - 1)
context.fillText(line.text, x, y)
})
context.restore()
}
著者情報
context.clipでプロフィール画像の表示を円形にクリップする。
import {loadImage} from 'canvas'で画像のロードができる。
ユーザーネームは右寄せにすると位置決めが楽
context.save と context.restore で、コンテキストの編集の影響を外に出さない。
const drawAuthor = async (
context: NodeCanvasRenderingContext2D,
user: User
) => {
const fontSize = 40
const radius = 40
const offset = { x: 115, y: 120 }
const { width, height } = context.canvas
context.save()
context.font = `bold ${fontSize}px roboto`
context.textAlign = 'right'
context.fillText(
user.username,
width - offset.x - radius * 2 - radius * 0.75,
height - offset.y - radius
)
context.restore()
context.arc(
width - offset.x - radius,
height - offset.y - radius,
radius,
0,
2 * Math.PI,
false
)
context.clip()
const image = await loadImage(user.portrait)
context.drawImage(
image,
width - offset.x - radius * 2,
height - offset.y - radius * 2,
radius * 2,
radius * 2
)
context.restore()
}
背景画像との合成と保存
保存先の存在チェックをする
sharp.compositeで合成
const saveOgpImage = async (canvas: Canvas, note: Note) => {
const buffer = canvas.toBuffer()
const baseImage = 'path/to/background_image.png'
const dir = `path/to/note/${note.id}`
try {
await fs.promises.access(dir, fs.constants.R_OK | fs.constants.W_OK)
} catch (error) {
if (error.code === 'ENOENT') {
fs.mkdirSync(dir, { recursive: true })
}
}
await sharp(baseImage)
.composite([{ input: buffer, top: 0, left: 0 }])
.png()
.toFile(`${dir}/ogp.png`)
}